Tuesday, 26 March 2013

Exams & Costumes

Right EXAMS first...

My daughter Billie ~~ my very clever daughter!!!!  80*  xoxoxoxox

She got her Science retakes results
(well couple of weeks ago actually but haven't got round to telling you all - Sorry about that, so here we go then!)

Yes I am very proud to say they were all A's  ~~ that means that all six of them are A's now (she retook the B results)

Physics P123 & P456
Chemistry C123 & C456
Biology B123 & B456

She loves Physics so much so she is taking it as one of her A levels
along with Maths, Art and now Biology (which she changed from psychology)

I am so happy, she is working so hard.

Next is her Art exam ~ which is over the next 2 days and she has just handed in her Product Design Coursework too.


Then she will have to complete her other art projects/coursework by 1st May.

And then its into all her other exams in May/June. 

Its very stressful for her and its been quite stressful for me too as I have been helping her as best I can, with ideas for her Art work, finding materials she can use (usually from my Aladdins Cave of a workshop ~ its amazing what I can conjure up from my cupboards) and just generally being there for her!!

She definitely needs the Easter break to have a bit of relaxation time!!

I expect we will need to go shopping as she will want to start sorting out her outfit for the next Comic Con  in May.   This is a comic/cosplay convention held in the Excel in London.  She loves to dress up and has recently dressed up as a Manga character Sakura Haruno (Naruto) for the recent Comic Relief 2013. 


She went around the school with her trusty bucket collecting for the charity but had some competition this time from the sixth formers doing the same thing.  She collected £28 as opposed to the last 2 events when she collected over £70 for Children in Need each time. She was a little disappointed but I told her that it was still good for one person to achieve.

She has decided to start blogging about her fundraising and her cosplay costumes and the events she attends.  When I get the link I will let you know (I cant remember what shes called her new blog!!!)


Next time will have new beads to show

Toodleoo

E x


Wednesday, 27 February 2013

New Button Designs

I have a few new designs for buttons

 
Spatter Lagoona Button


Seascape Button

I enjoy working the buttons they are always challenging and making sure the holes are good can be quite difficult at times.  I hope to come up with other designs too very soon.  The spatter design comes from the lentil bead designs I did way back last year, it is loosely based on the artist Miro.  I love abstract designs and want to create more designs in this way, I have a few ideas!!!   80))


I have also made some new cabochons in my seascape design too.  I was making some for my beadweaver friend Sue as she was making a piece for a competition so I made quite a few so she could choose which ones she wanted, the rest have been listed in my etsy bead store  www.chatelaineglassart.etsy.com


Ocean Tides
 
I do enjoy making them but sometimes they become misshapen (like the top cab did!) Oooppps!! It can be difficult to keep this design from losing the circular shape but with more practice I am sure I will overcome this!

Ocean Tides is the biggest at 28mm dia.  I make them on a white base with aqua for the sea and dark ivory for the sand with lots of decoration from silvered ivory stringer, yellow and coral dots to represent little corals etc. on the seabed and twisties for shell looking additions. A murrini is on each one for some added interesting detail like a jellyfish or sea urchin maybe!!

With the cabs I try not to get too close to the edge with the raised decoration as this can hinder the beadweaving encasement which holds it in place, thats why most of it is centralised.


Just need to go make some more me thinks!!  Maybe tomorrow ~~ Yeah!!!

Toodleoo for now


E x 


Wednesday, 30 January 2013

Big 50

Well I hit the big 50 last week.

Prior to that, I have been very busy with the latest Bead magazine tutorial.  I finally completed it on my BIRTHDAY ~~ eventually!!  Yep it took me quite a while to complete it but I got there in the end, I then trudged through the snow to the post office to get it off to the magazine. 

As for the weather ~~~ well the snow completely scuppered all my Birthday plans I had in mind and so I ended up cancelling my Ladies Afternoon Tea at Luton Hoo!! 

Its all posh and everything........


Very disappointed, I had to rearrange it and it will now take place this coming Sunday 3rd Feb.

I have a total of 17 (including myself) coming along and am very much looking forward to it!  The weather better be good this time!!!!


I did go out to dinner on my birthday with lots of my lovely friends and family, again the snow spoilt things as I was going for Chinese (my favourite) and ended up across the road at my local Hungry Horse ~~ so settled for my second favourite instead  ~~ Steak!! Lovely it was too!!  I had a lovely evening too. Billies pictures didnt come out too well but I think I have about one good one, she is still in training, bless her!!


I got some lovely pressies as well as lots of cards (not one 50 one was duplicated ~ very unusual!) Flowers, choccies and balloons everything you could wish for on your birthday!!!  Superb!!!


Hope to have some beadies for you next time as I am working on a commission for a friend!!

See you again soon


E x


Wednesday, 2 January 2013

Happy New Year for 2013

I never got to wishing everyone a Merry Christmas so thought I would make up for it by wishing you a very


HAPPY NEW YEAR for 2013


I have been thinking about the new year and what it may hold and I really hope it will be an improvement on this year ~ especially healthwise for me.  So I have been deciding on what things I want to do in the coming year!

I like to make lists ~ this helps me to remember to begin with, as well as having all my thoughts/ideas in one place to look back at.

Right were to begin???


1.  ART ~  I have been involved with helping my daughter in her Art projects for her GCSE's this year and it has made me a little envious and so I really want to get back to my paint brushes and get my canvases out (which are just sitting there doing nothing other than getting in the way) so why not get some paint on them and get them up on the wall.  Could use some collage images and some abstract art on them as well as maybe some of my daughters art here and there too, sort of a family collage painting, something along those lines anyway!

2.  STAINED GLASS ~ yes this is something I learnt a long time ago but havent done any making for a number of years!! The thing is I have a few areas in the house that need windows for that have been earmarked for stained glass.  Partly due to the fact I am unsure what designs to use for these areas along with the fact my workshop now is set up for beadmaking so my bench isnt fit for stained glass making.  I am unsure if I will be able to get this project underway this year but it goes onto the list, hoping I will get it done! 

3.  JEWELLERY ~  mainly tutorials, for the magazines and for here on my blog. I will just do those as I go along, making decisions on what as they come up.  I already have some in the pipeline anyway.  I do want to get more wirework pieces into my etsy store and am thinking about brooches/scarf rings, maybe finger /thumb rings and even some earrings too. 

4.  BEADS ~ now then this is a big issue!!  I have so many techniques to learn and also revisit to perfect the techniques also I want to come up with some new designs as well. 

Buttons (more, more and lots more!!)


Cabochons (love these, got some new ideas for cabs too)


Sets Designs ~ sockys,  focals as well as the sparkle beads (transparent small beads) too


spatter  


mayhem series


Jelly Roses, to name just a few


Focal Designs ~ Dynasty series,


Seascapes (like the cabs as well)


My Chatelle beads (Big Holes) get my new bead roller christened, this has different bead shapes.

Techniques I would like to try are  ~ the Chaos designs

~~  more DH silver glasses ~~ results arent always as good so need to get my technique more controlled!


Also need to get a better flame control this in turn will improve my designs as I cant always achieve the end result I want.   Just got out of practice I guess along with confidence too.

So need to be more positive and get cracking again!!!  Yep!!  Fire up my little Cricket!!


Roll on 2013!

80))


E x


Saturday, 22 December 2012

Christmas is getting close!!

I have struggled so much this year trying to get ready for the arrival of Christmas!!  I can't believe I still haven't purchased any gifts other than my husband/daughter's present of a (joint) laptop.

Billie needs it for her school work so she can use it up in her bedroom for revision of her GCSE exams.  She got her Mock results last week and they were pretty good - some better than expected.  Her dragon for her Art & Design mock sadly broke in the kiln (previews in a previous post), she has glued it back together, hopefully with a good paint job it shouldn't be to bad!!  She then has her science resits in January, she got B's in 3 of them so we decided why not give them another go to see if she can get A's in those as well, she was only 2 marks off the chemistry one!!!  She can't lose as she keeps her best grade either way!! 

She will also resit her English language module which the school has agreed to put everyone back into resit it because of all the wooha over the government changes they made mid-year!! She got a D and her target grade was a C she was pretty devastated by that!!!  

So now we are trying to work out what she wants to do for the future, its so difficult making these decisions now, she is still 15 and trying to decide on her future.  She wants to carry on into the 6th Form and do A levels. She is suppose to pick 4 only, so wittling down from 11 has been very mind-blowing!!   I think we're nearly there now!!  Phew!!

Mick needs the laptop to download his music collection (records) when we had to wipe the system on the main computer I didnt know he hadn't saved anything onto disk/memory stick so he lost everything he'd done already!!  He was gutted!! So they are both sharing the laptop, I will need to get him an external hard drive I think to save everything onto so he won't lose it all again!!


So hence Christmas has taken a bit of a back seat, I just cant seem to get interested in it at all. My biggest problem is the fact my oven is cremating everything I put in it!! 80((  Yes its about 23 years old and has seen better days, the thermostat has gone and my hubbie says the parts are now obselete so that means I need to get a new one.  I dont want to get a new one, they don't make them like they used to (mine is a split level one) my kitchen is only half complete and I just didnt want to buy one right now, so what to do?????  January Sales I think cheap and hopefully cheerful!!!   So not much chance of getting a christmas pressie this year! 80((


Its my birthday again in January, only this is a biggy!! 

Yep 50!!

Oh gosh!!  I feel ancient, at 40 I seemed to change over night but 50 I really dont know how thats going to go!  I know one thing I really want to do something a bit different, special ~


a flying lesson!


            No not a glider a real plane!! 


Checked it out and I have found a company on the web

http://www.intotheblue.co.uk/flying-experiences/fly/flying-lessons/panshangeraerodrome/

this is at Panshanger in Hertfordshire so not too far!! I am quite excited about the experience but I will wait until the spring for better weather.  I am still trying to work out what to do on my birthday, I am thinking of doing an Afternoon Tea type gathering, I'm working on that one!!  Will update you when I have decided.


Thats it for now, nothing new to show you jewellery/beads wise, I am working on tutorials for Bead Magazine right now so got to keep that under my hat. 

One thing though I can hear my paint brushes calling me from my workshop, I might just have to go answer that call, must be all the art stuff Billie is doing at school, she keeps raiding my art and craft supplies and its making me think ~ I do miss it!  I need to get those canvases out which seem to be cluttering up my space!  Mmmmmmm problem with that though is I love doing life drawing, I might need to go join an evening art class!!

Maybe I'm having another mid-life crisis at 50!!!  Ha ha ha!!

Catch you next time!!


E x


Monday, 17 December 2012

How to make Basic Earwires


Wirework Tutorial

How to make Basic Earwires

 
In this tutorial I assume you know how to turn a loop in wire!  I also make earwires at the same time this helps with making them exactly alike!


So here we go then ~~~


Equipment and Materials you will need:


Half Hard Sterling Silver Wire 0.8mm
Wire Cutters
Round Nose Pliers
Ruler

Mandrel - You can use a Ring Mandrel or Multi Tool but
I have used a piece of steel piping, you can also use a pen barrel (make sure it is completely round - no flat edges to it)
Silver cleaning cloth


You also need for forging the wire:


Hammer ~ a Chasing hammer is preferable but a ball pein hammer will surfice (make sure it has a nice smooth head any dents etc. will mark the wire)
Anvil or steel block

Needle file


1.  Take your wire and unravel enough to use approx 8" then to stretch/straighten the wire, run it through your thumb and forefinger a few times (this also helps to harden the wire!)


NB: You don't need to straighten the wire completely this just helps with measuring the amount your require, as the curve already in the wire can be helpful in the process of making the earwires.

Cut 2 x 4" pieces of wire.


2.  Now to make a turned loop in each wire, grasp the wire with the round nosed pliers, making sure it is right at the very tip of the wire.


Turn a loop around the blade of the pliers.


NB: If you left the natural curve of the wire make sure you turn the loop in the opposite direction to the curve (see below).


Repeat to make a loop in the other wire.


3.  Take the mandrel (piece of pipe) and place the earwire over it, making sure the loop is facing out (perpendicular to the mandrel)


Curve the ear wire around the mandrel, at this point you could do both earwires at the same time, this helps to make them to near 'exactly' the same!


Bend them around the mandrel so the ends nearly touch the loops.  They will spring back and open again.


4.  Still holding the earwires together, grasp them approx ¼" from the end with your round nose pliers, bend the wires back slightly to give them a straight end.


It is your choice how far you want to bend them.


NB: I usually tweak the earwires a little now so that they both look completely even, until I am happy with them.


5.  Trim the ends so they are equal in length, make sure that both the earwires are held in the same position


They should look something like this!!


6. Now the ends need to be filed with the needle file to remove all the rough edges.


First flatten off the end, and then work around the edges, always pulling the file down across the wire with fairly small sweeps.


NB: NEVER file backwards and forwards across the wire ONLY downward sweeps!!


Repeat for the other earwire.


Depending on what, the loop end of the earwire, seems like you may want to file these too. Either before you make the loop or you could twist the loop out slightly so you can get the file in to smooth the ends, don't forget to straighten again afterwards! Or do this before turning your loop in the initial first step.


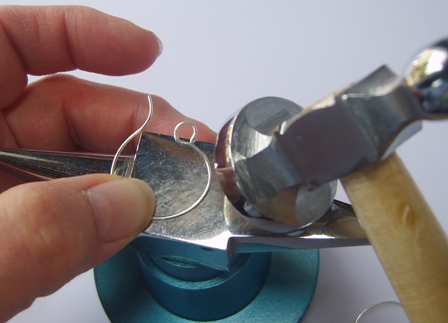
7. Now to help strengthen the earwires you need to do a little forging of the front part of the wires.  Place the earwire onto the anvil or steel block


With the chasing hammer now lightly hammer only the front part of the earwire, making sure not to hammer the loop,


turn the earwire over and do the same to the other side.


Repeat for the other earwire.


NB:  The forging process can distort the earwires sometimes so they will need a little tweaking to help straighten them again.


8.  Well, all that is needed now is to clean the earwires to give them a lovely shine and remove any dust particles.  I generally use a silver cleaning cloth as they are quite small but if you have a tumbler this can help strengthen them or you can use a Dremel like power tool too (being very careful).


There now your very first pair of earwires!!! All made by your own fair hand!!


I posted this tutorial on my other blog back in 2010 and decided to move it over so you can still have access to it here on my new blog. I hope it is helpful and I will be adding more tutorials in various wire working techniques in the future.
 
 
Enjoy
 
 
E x
 

Monday, 10 December 2012

Pendants for birthdays

Thought I would show you some new pendants I've been working on for presents and myself.

 
Desiree

Made using one of my own beads from my Dynasty Collection and gunmetal colour coated wire. Wire weaving using various weaves with my own distinct design style, this one is for me.  I love this bead so thought ~ Yep that one is mine!!  Still need to work out what to hang it on, cant decide that one yet!


JosieJ Pendant Necklace
 
This was made for my friend Josie who just had a special birthday, lots of weaving using pink and black coated wire with another of my own beads in the centre.  She does love PINK!! I have added 2 types of black plated chains with an additional chain which is a shorter length so she has a choice as to which length she would like to wear it ~ long or short!


Few close ups for you

She did get it a day late by the time I'd finished it, well I seem to have lots of friends and family celebrating big birthdays all at once.  Josie was 40 then my husband's cousin was 50 the a friend was 60 and another 70 during last week!  Phew still got christmas to sort out yet!!!


So here is Denise's present for her 50th!

 
Sterling Silver Initial Pendant
 
I am thinking I may make up a few of these initial pendants and pop them into my etsy jewellery store, in various different metals!! This one has blue swarovski crystals to add a little sparkle and then hung on a sterling silver snake chain.

There we are then, thats it for now!

Toodleoo!


E x


Wednesday, 21 November 2012

ChatElaineJewellery.com is Closed!!

I have closed down my website ~~ ChatElaine Jewellery .com but my Etsy stores still remain open. 

It has been a soul searching decision but felt it was for the best.  I fired up my domain name 3 years ago but found that I havent been very successful with sales from my website all my sales have been through craft fairs, home jewellery parties and for my beads from my Etsy stores.

Craft fairs have seen a decline, especially in my area and so I don't sell this way anymore! It is heartbreaking spending so much time making jewellery, travelling and setting up and then no sales, packing it all away again and not even covering the cost of the table, very demoralising!!!  Home jewellery parties are quite hard to come by and so I decided I needed to concentrate on my beadmaking from now on. Jewellery will take a back seat, making mainly for myself or friends and family, also coming up with projects for the magazine.

The way I would like to go is Bead Fairs for my lampwork beads, I am not at a place where this can happen yet but hope to be there in the future!!


The family has taken a bit of a back seat for the last few years but that needs to change, my daughter is in her final year at school and her first Mock exam is this thursday.  So I am concentrating on helping her when she needs me as this first mock is Art and Design.  She is working towards making a sculpture, she has made some preliminary models and so can you guess what it could be????


DRAAA-GONS!

Ain't plasticine great!!!  Ha ha!!

Its just like being a kid again, of yes she still is really!!!  Silly me!!

We are having a little trouble on how she can do the wings as she really wants them flapping up,  but I really think it might need an armature wire but worried it wouldnt survive in the kiln!!

Its a 10 hour exam which is all day thursday (5 hours) then 5 lessons of an hour each!! So over the next 2-3 weeks she will have to finish it. Her other mocks are next week, her science re-sits are in January and then her proper exams start in May.

Phewwww!!  Cant believe it, seems only yesterday she was starting school, now we have to start working out what she wants to do for her future career!!  Very hard decisions to make ahead!!  Mind boggling!!

Catch up soon.


E x

Tuesday, 30 October 2012

More Tutorials

Well here is the latest issue of Bead Magazine which is the Winter Special Edition which has a theme of 'Through the Decades', issue 42. 


I chose the decade of 1910 which is Art Nouveau style so for my design I came up with a wirework brooch called Nouveau Vines Brooch. 

Wire is copper in 1.25mm with green wrapping wire in between copper leaves with vine type tendrils and a pin with a 3 petal flower at the top. The green wire I chose to emanate the colour of enamels used in the jewellery of this period. I always think copper and green look great together and I am particularly pleased with the final piece.  


This will hold an open/loose weave scarf or shawl maybe you could also use it as a hair barrette, the pin has a slight curve to it to allow for fabric or hair!! I think I need to come up with other designs to add to my wirework collection.


I so love copper and have decided that it will be one of the main metals of wire I will use, along with brass and bronze too. I do use the colour coated wires as well this has a copper base but as for silver, which is expensive now, I won't be using that very often ~ its mainly due to the hallmarking which we have in this country for silver with the weight exceeding 7.78grams. The extra costs this entails is not feasible for me at this current time.

I have now been trying to come up with some future designs for the magazine and bangles were ideas I have come up with.  That one won't be in the magazine until next year now and I also have a linked necklace on the agenda too.


I have a sample bangle I can show you and this was made using a basketweave around the back.


Bit funky but fun!!


Very enjoyable but it took longer than some of the other weaves to do but very effective.

Love the turquoise wire,  weaving is much easier to do in the coloured wires as they are softer to work with, not so demanding on the fingers but they do start to get a little sore about a few hours!!    I love this weave.

No lets see if I can actually publish this post now???  Internet not playing ball, very frustrating taken be ages to get it to work!!

Ta ta for now

E x


Wednesday, 10 October 2012

Tutorials for Bead Magazine

I have been making tutorials again for Bead Magazine, I enjoy making them especially if they go well. I get a little worried when the deadlines come around but I just about make the deadline in time ~ phew!!


Its a ring called Hugging the Rose made using bronze wire and a lovely pyrite rose bead, I do love bronze wire, mmmm gorgeous colour and a very sophisticated feel to it!! 


This is the article photo ~ so as you can see its a very professional composition unlike my own photos, not my fortee I'm afraid, I would love some photographic instruction, its also the props that make it look so good too.

I have another tutorial coming up in the next issue as well, this is a Special Winter Edition with a Decades theme. My project is a brooch with an Art Nouveau inspired design.  Cant show that just yet as it wont be out in the shops for another couple of weeks. Will post it then!

~~~~~~


Life is a little hectic just now as I am doing more hours at work so finding the time to fit beadmaking in seems to be limited to tuesdays and weekends mainly.

I have a new venture too, back in september the family and I went to Brighton for our annual visit (we love Brighton)  I did my usual seafront gallery visiting and got chatting to the gallery owner of the Cactus Gallery and she wants to have some of my beads in the gallery.  So lots of brightly coloured hearts to make and buttons too.


I've started!!!

Many more still to do!!

Show you more next time as torch was lit again yesterday!!


Ta ta for now!!


E x