Showing posts with label beads. Show all posts

Tuesday, 12 May 2015

My first full Rose -- Week 12 & 13

Roses that's why I went to have a lesson with Laney I really wanted to learn how to make roses. Up until now I hadn't made a full rose only buds and a half rose. 


Week 12

Orange petals with the yellow around the edge was still the way to go, as I did have few remaining from the previous time, I made lots more and this is how it turned out.


Very proud that it survived.


Week 13


My new Ombre style headpins which are two-tone and named from the hair trend at the moment with dark hair on the top part of the head graduating down the hair to a light  or blonde at the ends

Love these colours Ultramarine down to aqua tips


Yumm!


More weeks still to come.


E x


Thursday, 26 February 2015

Week 8 -- Practising Flowers

I fired up the torch last Sunday and was eager to do some more practising of flowers and leaves.  I wanted to make some headpins with leaves and then I had a go at pulling some petals for a flower, they came out quite small and so thought I would try making a headpin flower, not sure if its any specific type of flower but it was fun trying.


I also had a go at making some rosebuds too.  Each one improved a little each time I tried but I find I keep over working the petals when I put them on so they lose the 3D texture of each individual petal (like the one on the left).


The one in front is the best one so far!!

More practising required!!


Will keep you posted!!


E x


Saturday, 31 January 2015

Week 4 -- 52 Things -- Entwined Hearts Earrings

I made these a while ago but never got round to finishing them, I needed to finish off the earwires so finally got my hammer out and gave them a little pounding!!


Entwined Hearts Earrings

My little spotty dotty beads, with 2 colour dots on white and my own design wire earrings with handmade earwires too.

I really love anything heart shaped, I love to make heart beads and I have a new heart press which I got last year at Flame Off and I still haven't used it yet, really desperate now to try it out!

I NEED TO GET INTO MY WORKSHOP!!

So many ideas to get cracking on, the list is getting longer!!!

If I don't get there I'll just have to get on with something else!!! Mmmmmm what could that be????

You'll have to wait and see!!!

E x

Friday, 6 June 2014

Coring Chatelle Beads

Chatelle beads (if you don't know) are my big hole charm beads (5mm dia). Most people have heard of Pandora beads these are glass charm beads which thread straight onto the bracelet and they have a silver core to the hole.   I have named my charm beads 'Chatelles'. Can you see a connection to my ChatElaine Glass Art name?? 80))  Well I liked it!!


So I have been making Chatelles for sometime but unlike Pandora beads I don't silver core the holes. I have used grommets or rivets which you can glue into each end of the hole, these work ok but it depends on the hole width so can leave a gap in the middle of the hole core, not so good!!

However, I would like to core the beads properly but don't really have the right tools to do it. I decided last year to get some dapping punches as this was the cheaper option to achieve the coring because most of the coring tools/machines come from the USA. So getting them here is quite expensive with shipping of heavy equipment and the added customs charges probably on top as well, hence dapping punches!

Well now then, have I used them punches ...... N. O.  No!!

Couple of weeks ago a lampworking friend had a Meet-up at her place and guess what, she has a number of different coring machines and they were all out for us to try!!!  Yippeeeee!!!


She showed us how to use each one, what we needed to do and we were off 'out the blocks'   as quick as you like!!  Cutting the tubing to length, annealing the metal and into the machine to get it to lay down each side of the hole.

Here is my first bead cored in copper

 
Confritti  Heart in Pink with a little flower on the shoulder


I now have some copper tubing on its way and my dapping punches will get dusted off and taken out of the box!!  Very soon.

Been busy making beads lately so hope to have more to show you, hopefully, just so long as the kiln fairies are being kind.

Till next time

E x


Monday, 12 May 2014

Birthdays

There has been a few birthdays in my world over the last month or so, all needing something special.  My friend Rosemary's birthday was at the end of March,  I wasn't sure what to get her, then I thought why not make her some beads as she is a novice jewellery maker, she loves gemstones and watches the Jewellery Maker TV channel constantly and buying various gemstones that catch her eye!

I wasn't sure what to do so I made some beads and they didn't go to well as I was trying to create a leaf as a focal bead but I need a bit more practice I think and it ended up I didn't have any beads finished for her actual day!  So lots of apologies were given to her and I promised to make her something very soon.

Oh dear it was difficult to get something sorted so I decided to ask her if she wanted any colours in particular. Ah well 'blues' really she said, as she has a new dress to wear to a wedding she is attending in early June.  She sent me pics of the dress and off to the workshop I went.


It is from Phase 8 and its called Edith Blossom Dress its very pretty, I tried to match the blue colours, so I picked some blue glasses in various shades and also included a new CIM colour Antique Lace which is a cream colour and some splashes of black too.


Edith Blues Set


I was quite pleased with the match.  I popped round to see Rosemary yesterday and we did a little match up with the actual dress and the transparent blue (Effetre Lagoona) was a bit dark but the other blue was really spot on, along with the cream too!  she liked the beads but they weren't quite right.

Now I have seen the dress up close there was a few other colours in it that seemed interesting so I am going to try and recreate those by doing a little colour mixing to see what I can come up with.  I will let you know when I have had a play and see what happens!


The next birthday was my Mum's, her birthday was last weekend she was 78 and I didn't have a clue what to give her.  She doesn't really want for much, I often make her something but wanted to do something different this year, so I decided that it would nice to take her up to London and go to the Theatre to see a show. I told her what I was thinking as I wanted to take her to see something she would like to see, so I gave her a little list.

I fancied seeing 'We Will Rock You' and few others but when I told her what one interested me she agreed that she wanted to see it too.  If you don't know what that is well its based around Queen songs but the story is set in the future when there are no musical instruments and everything is online including music.


I found some tickets for us both to go on Saturday (10th), its on at the Dominion Theatre in Tottenham Court Road.


We went up on the train and had a great time, it was really fantastic. It was like going to a concert really the singers were really good. She loved it and so did I.


Yes it really did have a motorbike on stage!


We had a bit of dinner up there too. She was pretty worn out when we finally got back home but she said it was well worth it.


I have been making lots of different headpins again, I love making them so much scope for using them with the glass finials on the end of the wire.  I use mostly raw wire like copper, brass, bronze and I will also try some sterling silver too. I won't use plated metal as it will be difficult to clean it as I think the plating metal will probably come off during the cleaning process.

Hoping to get some of the headpins listed very soon in my etsy shop, here is a bit of a preview for you


Marbled Ice Headpins


Multi Leaves and Drops Headpins
(previously seen but now annealed)


Also a nice pair of round beads in the new colour from CIM called Poseidon


Great for a pair of earrings, loving these may need to keep them for myself!!  80))


Till next time


E x


Sunday, 23 March 2014

More blogging required

I am needing a kick to get me started,  I have finally added some posts this week but I really need to set myself some goals because I am totally unorganised at the moment.


I did promise to add more tutorials to my blog and so I need to make LISTS!

Yes back to the good ol' LISTS!

Whenever I lapse not using Lists I just go to pot!
Here we go then .........


1. Do tutorials for my blog.

2. Take photos of beads with new backgrounds to update them.

3. Make new beads and cabs.

4. Make some new jewellery, try out my new letter stamps and disc cutter

5. STOP PROCRASTINATING, get on with the jobs I need to do (see all of the above)

6. TIDY THE HOUSE -- ITS TERRIBLE!

7. Go to bed at a decent time! Not at 2am, 3am, 4am I'm getting to old for this!!

Hello my name is Elaine I have an addiction -----  LAZINESS! 

Blinkin' well pull your finger out and get on with something women!!!!

Right I am now officially told off -- will it help  ...........  I doubt it!!

E x

Sunday, 15 December 2013

Christmas Smash Sale

I am having a little SALE in my Bead shop on Etsy.

Christmas Smash on some of my new items - buttons and headpins.

I haven't been making much at this time other than getting Christmas sorted out. This is very rare for me usually I rush around in the last week before Christmas, not this year! I was determined to get organised and I am afraid creativity has ceased!!!

So all I have for you is my Red hair!!!


Swoosh


I love it this colour, my favourite!!!


80))


E x


Tuesday, 10 December 2013

Top Tip Tuesday ~ Jewellery Basics Tutorial ~ Turning Loops

Jewellery Basics Techniques


I will be adding a number of Jewellery Basics to my blog along with other techniques in wirework.
 
In this tutorial I will show you how to make a turned loop using both methods, I have used one single bead to show how to do it with a bead in place.  I recommend that you try a few times on some spare, old or cheap headpins to practice before making a pair of earrings, for instance.
 
A Turned Loop


1. On a headpin place on beads in desired pattern/design.  


2. Trim headpin down to approx. 1cm above the last bead.


3. Take the round nosed pliers, grasp the end of the headpin between the blades at the very tip.


Tip:

Ensure the tip of the pin does not protrude above the blades of the pliers, run your finger across the top of the blades ~ you shouldn't be able to feel the tip of the pin.


4.  Turn the pin around the blade pushing down with your thumb to form the loop, until you can't go any further.


5. Reposition your blades to continue with the loop until it closes, straighten you hands to allow you to continue comfortably


this should resemble a ‘p’ or ‘q’ shape 


6.  To finish the loop, place blade of pliers into the back of the loop


NB:  take careful note of the position of the blades in the loop
  

7.  Bend back the wire to centralise the loop above the bead  


You may need to ‘tweak’ the loop as the bending can cause the loop to open a little, to close it up, just place your blades into the front of the loop again and just pull around to remove the gap, making sure you have fully inserted the blade into the loop, otherwise the loop can distort.    
You could also squeeze the loop together using flat nosed pliers, very slowly and carefully ~ too much pressure could end up completely distorting the loop and destroying the circular shape of the loop.


                                         A Turned Loop
 
 
Turned Loop – Alternative Method

1.  Place beads onto a headpin, bend the pin back at 90° angle just above the bead


2.  Trim headpin to 1cm.  Grasp pin with round nosed pliers at the very tip.
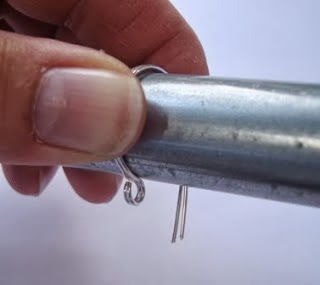


3. Bend the pin around the blade to form the loop in the opposite direction to the bend        
                                          

Tip:

Use your other thumb to help guide the wire around the blade as before.


NB:
 
If the end of the wire sits above the bead, too high, then you can trim the wire and carry the loop round to close it once again.  This shortens the wire so bringing it down lower, nearer to the bead.


That's it all done!


Next time ~~

I will show you how to make a Wrapped Loop ~  a little more complex than the turned loop but definitely worth the effort to master this technique as it has many uses and is a very fundamental wirework technique.


Til next time

E x


Sunday, 10 November 2013

Chillin' out!

I did sort of end my Blogtoberfest rather abruptly but I was getting ready for my Wirework for Beginners workshop which was on Saturday 2nd November.  It went well and my ladies seemed to enjoy the day!

I took my camera with me but as usual forgot to get it out and take some piccies!  Maybe next time!

I taught them how to use wire and turn loops ~ we made some earwires, hammered them and I showed them how to make spirals and then coiled wire. They went home with their earwires ready to use, we did run out of time to finish them completely but they should be able to finish them at home.


Wrapped Loop


Making Earwires


So last week I had a bit of a chillin' out ~ time off from jewellery making, beadmaking and being online.  Family was top of my list!!  


Right, now I'm back its time to get cracking on my long list of 'THINGS TO DO'!! 

I do make lots of lists otherwise I just cant remember what I need to do, my memory is terrible and this is my only way of getting things done!

1. I intend to blog around 3-4 times a week

2. Make beads lots of new designs as well as revisiting old designs too.

3. Christmas shopping I am determined not to leave it until the last week before Christmas because I usually have so much jewellery making to do, for selling and for presents too.

GET STARTED!!

4. Have fun!!


80))


See you next time!

E x


Monday, 21 October 2013

Blogtoberfest DAY 21

Oh dear dear me!! 

I have failed to keep up on my Blogtoberfest every day posting!!    Slappy Handy!!

Days just seem to be whizzing by and I haven't been around to organise what I wanted to post about!

I really am going to have to play catch up now but not necessarily in the order of my original schedule!  I am not good a time keeping so why I thought I could keep to a schedule I really don't know!!!  Ha ha!!


So Saturday Snippets

I headed off to the Big Bead Show at Sandown Park in Esher, Bead Magazine's Bead Show and their British Bead Awards, the winners where announced and Best in Show voting by the Bead Show attendees, I placed my vote but I didn't win any giveaway prizes though!

I did, however, get a bit carried away and my 'flexible friend' suffered a bit!

Tools were on the list amongst other things ~~ wire mainly but I did need that for my workshop which I might add is looming up fast on the 2nd November.  I have some students booked on it so its a Goer, YAY!   Need to make sure I have the necessary wire for that.

Well back to the TOOLS!

Top of my list was Letter Stamps for metal. TICK got those!  You might see my endeavours in the future.

New pair of wire cutters.  TICK got those with orange handles no less!

Pin vice, TICK.  Another pair of Nylon coated pliers, TICK got those!  Digital Calipers, TICK. And a Center Punch, TICK to them all! 

I did get a few beady things which included some solder paste and some st. silver beads and bead caps from Palmer Metals.  Gosh won't I be a busy beader!!! Whoahoo!!!!


I didn't get the wire as the supplier wasn't at the show so will need to order that on line, but I think I did quite well!  80))

And it was also my Wedding Anniversary so a lovely Chinese Takeaway for Tea!! Yum yum!


Next ~ The Sunday Gathering


I have got a few new beads to show you along with some new headpins which I have listed in my Etsy store


Jumbo Chatelle Beads


Leaves Headpins on copper wire


Sea Urchin Buttons and beads 

Just as few new things.


I do need to do some forum bits and bobs but will pop back to do that when I have sorted it out.


That's about it for now


E x


Tuesday, 15 October 2013

Top Tip Tuesday ~~ Design Tips Part 2 -- Interpretation


DESIGN TIPS ~~ PART 2 

 INTERPRETATION


In this second part of my Design Tips I will cover Interpretation and how to use your ideas for a design.  

When you get ideas for designs I find it best to keep them together for ease of access to the information you need.  I have found a ‘Diary’ to be valuable for writing down ideas for colour combinations, designs and even how I could execute designs onto a bead or in a piece of jewellery.  It is simply a notebook or sketchbook where all your ideas go when you have that ‘light bulb’ moment! 

They can strike at the most inconvenient time when you’re going to bed, on the loo (hee hee!) and of course when you are out of the house ~ at the office, in the park with the kids, now I was going to say ‘up a mountain’ but that is much more difficult to get onto paper and you could just plain lose that one I’m afraid, especially if you are hanging from a rope!!!!

But, then again, you may remember it when you come down off the mountain or you could, of course, have seen something which you may be able to take a picture of to remind you again later! 

A camera is another invaluable tool for a designer!!  Oh Yes! We don’t just need it for taking pictures of our work, that’s for sure, so remember to carry it with you at all times!  Don’t forget your Diary too!  Choose one that is not difficult to carry around with you, size wise that is, an A5 or even A6 would be very adequate.  I have to say I have a number of different types of Diary of varying sizes, some are notebooks and others are sketchbooks depending on what I need it for.

When I want to make some jewellery for myself or maybe even a commission, for instance, I would start by working out what colours I need for the particular outfit I need to compliment.  I need to determine what style I want for it ie. long, short, pendant, chain linked, simply strung, etc.  I then need to decide on the right amount of beads I will need to produce it, along with the colour combinations, patterns including what type of metals especially if I want chain included in the design and what would best suit the colours I have chosen as well as the shapes and sizes of the beads, what they are made from and then how they will be laid out!

Oh Yay, we are DESIGNING!!!

I know I make my own beads which means I can produce what I need for my item of jewellery, I realise not everyone can do this but it is then a matter of finding what beads you want to produce your piece of jewellery and purchase them from either a supplier or even a lampworker (like myself) whose style of beads you love and maybe even commission a set in your required colours.

Here is a commission I made for a friend, she wanted something simple and ended up picking out the focal bead I had previously made and so after making a few more beads in the same glass and some metal spacer beads, VOILA!


Star Bracelet


In my ‘Camouflage Mayhem’ range of beads, I made a set in an orange and brown colourway which were called ‘Tortoiseshell Flies’ maybe a bit of an odd name for a set of beads, I hear you say!! Well maybe your not saying that but I will explain a little of why I gave this range such an unusual title!

My Camouflage Mayhem range came about when I was trying out a new glass from CIM (Creation is Messy) ~ what a great name for a glass range/company, eh!!  and it is one of my favourite types of glass to use.  It was a green glass named ‘Commando’, dark green resembling an army camouflage colour.  Well this colour has some qualities that can come with some greens in the many glass ranges, it can be reactive with certain colour combinations, ~~ ivory being a great example.  So I did, I used ivory with the Commando and ‘Hey Presto’ I ended up with a dark webbed ring around the dots I placed with the ivory, onto the green. I then stacked more irregular dots and some of them reminded me of the actual uniforms that the military wear ~~ hence my new range was born!!!


GI Jane

My first set of beads In the Camouflage Mayhem range

I started to jot down other ideas in my Diary notebook, of colours that I could use to replicate different camouflage colours. Then a ‘light bulb’ moment struck me, Animals!  I could use their colours to inspire me in this range, as they use Camouflage to disguise themselves in the wild, birds, insects even marine life were all possible inspiration and open to interpretation in many different ways.

Now, have you worked out where the ‘Tortoiseshell’ comes from for my Tortoiseshell Flies set.

I think you may have guessed it!  ~ Ha ha!! 


BUTTERFLIES!! 

The Giant Tortoiseshell Butterfly to be precise. On visiting the local Whipsnade Zoo, where I had taken along my camera (don’t leave home without it!!)  they have a butterfly and insect garden and as I wandered around I captured some pictures of butterflies feeding on the flowers!  Unfortunately I have not got those photos anymore as my disc is corrupted sadly!  I have found a few on the net for you though!!


Gt. Tortoiseshell Butterfly


Tortoiseshell Flies Set


Peacock Butterfly
Look at those gorgeous colours, very similar to the Gt. Tortoiseshell
On my return I got out a book from my extensive “library” called The British Country Companion which has many species of butterflies, inspects, birds, etc. it has given me many ideas for colours for my Camouflage Mayhem range, what better way to interpret an idea than using wildlife or even nature to help guide you to endless possible design ideas.
 
 
Leopard


Little Robin Red Breast


Here are some other colours I have used for the range and I will name them and leave the rest up to you to decide where they have come from!!

 
Funky Uniform


Blue Tweet Tweet


Pink Leopard 


Daffodils and Periwinkles
 
My Glass Diary is filling slowly with other ideas I have come up with along the way.
 
Dotty Socks & Ducky


Socky Dots Beads


Ducky Dots


I now want to show you a few things to get you started, to help you with your own ideas! And run with it!
Monet's Garden


Nature, Marine & Animal pictures


Sweets and Desserts


I hope this has helped a little with your interpretation of things around us in nature, animals and even some more unusual things too!


E x


Next Time I will cover:

Design Sources ~ what and where to find ideas and how to interpret them.