Showing posts with label pliers. Show all posts

Tuesday, 15 April 2014

Top Tip Tuesday ~~ Tutorial ~~ How to make Wrapped Loops

How to make:  Wrapped Loops


You will need:

Wire cutters
Round nose pliers
Flat nose pliers
Chain nose pliers

Head pin
Beads


1.  Onto a headpin place on desired bead(s), do not trim headpin as you did in the turned loop.


2.  Grasp the headpin with round nose pliers, approx. 4mm above the bead


3. Start to pull the wire around the blade of the round nose pliers, using your fingers or chain/flat nose pliers, to form the loop.


4. The wires should cross over


bend back the upright wire to centralise the loop (as in the turned loop)             


Tip: At this point you need to attach to the chain and/or earwire, if do not want to use a jump ring to attach the bead component.


5. Now take the chain nose pliers and hold the loop,


Grasp the loose end with a second pair of pliers (I use flat nose pliers but you can use whatever you have), pull this wire around the upright wire; ensuring this wire is perpendicular to the upright wire.


Tip:  If the wire is not perpendicular you will get sloping or diagonal wraps and they may not be neat and tidy. Using the flat nose pliers, straighten this wire so it sits perpendicular.


6.  Continue to wrap the wire around the upright until you get to the bead, the usual amount of wraps is 3 but it can be any number you want it to be, you are only limited by the length of wire left on the headpin.


Tip: While winding take the wire to the top (still holding the loop with the chain nose pliers), let go with the flat nosed pliers and reposition your hand by grasping the wire from the back and carry on by pulling the wire round and towards you 


and up 


let go again and reposition as before to pull upwards to the top once again


Don’t try and complete a wrap all in one go!


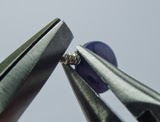
7.  Take the cutters and trim off the wire end as close to the base wire as possible.


Tip: You may need to straighten the loop after the wraps are complete as it can sometimes tip over slightly. Put the round nose pliers back into the loop to do this, as if re-turning it again.


Also the base wire can bend over slightly, just use your flat-nose pliers to straighten the loop so it becomes upright again.  


8.  Take the chain and/or flat nose pliers and tuck the end in by squeezing it down


slowly moving round the wire so no more wire is sticking out, until it is neat.


A Wrapped Loop


The wrapped loop is a little difficult to get right but with practice will become easier.


I hope you find this tutorial helpful and if you have any difficulties or any questions please contact me, I am happy to help.


Once you have mastered the wrapped loop, it is a very useful skill to have and can be used in many different ways within different types of jewellery making, earrings are a very common use but can also be used in bracelets, pendants/necklaces for linking or connecting components together, maybe in brooches and even in other types of accessories.


Bangle on a wire, connection to chains.


Beaded Finial on the clasp of a bangle


Necklace - Beads on a wire, connection to chain


Bookmark -  Connections between beads


Next time I will cover Coiling (I do not use a Gizmo) all done by hand.


Until then lots of practising required.  80))


E x


Tuesday, 29 October 2013

Top Tip Tuesday ~ Working with Wire


Working with Wire


What you need to know about working with wire!

Here is the first in my new series of Working with Wire.  It will include Top Tips on Tools and Wire Gauges ~ What to use & when and how to use it.

Top Tips    ~~  Stretching/Strengthening Wire


Before starting to work with wire it needs to be stretched or straightened, this strengthens and hardens it slightly, it also takes out a lot of the bends and light kinks it may have.

To stretch the wire, depending on the gauge -I will base it on 0.8mm (20g) wire, a pair of nylon coated jawed pliers are invaluable but you can use your own fingers (which is what I did for a number of years before getting my first pair of pliers).

Place the wire between the jaws of the pliers, starting nearest your hand, squeeze pliers and pull along the full length of your wire as far as your arms reach will allow. Now move the pliers to that position and carry on until the end of the wire. Repeat this action 2 or 3 times.


NB:  It is advisable to use around a 1m to 1.5m length of wire if you are using it for wrapping or coiling, if you use longer than this it is more likely to get tangled and kinked, plus can become difficult to handle and a possible chance of injury!


Wire makes a wonderful whipping noise through the air while working with it ~~ Love the sound but eye protection is necessary! 


~~~~~~~~~~~~~~~~~~~~~
 

Top Tips  ~~ Hammering Wire

 
When you have made your item, say for instance, a clasp/hook with a loop to connect a bracelet or necklace, you will need to strengthen it to stop it from bending or distorting.  Hammering the item will give it stability and strengthen it to stop it from doing this.

There are a couple of ways of hammering wire, it will depend on your chosen effect of the finished look to the piece!


Firstly, you have to decide if you would like a flattened look or a rounded look to your wire item:

Flatten Look ~ you can use a ball pein hammer on a steel block hitting the wire many times on the circular area of the clasp/hook or loop. You will also get hammering marks appearing which gives a slightly faceted look to the piece, this can enhance the feel of the piece and give it a more rustic effect.


NB:  Do not hit any wire areas where they cross over each other!


If you have a chasing hammer and prefer a much smoother feel to the piece then because of the lovely smooth, domed head of the hammer, it will not facet the item as much as the Ball Pein hammer. You can also use the round (ball end) head of the chasing hammer, this will leave slight indents in the wire and give a different type of finish altogether, to the wire.


Rounded Look ~ if you prefer to leave the wire in its natural rounded shape then the Rawhide Mallet is the hammer to use or a rubber mallet if you have one!  This hammer should not leave any marks on the wire or flatten it but it will still strengthen it.


Hope this is helpful.

Please comment if you would like any further advice!

I will come back when I have some photos to add, I couldn't find the photos I thought I had for this posting.


Next time ~ will be on Wire Gauges and when to use them.


E x


Monday, 21 October 2013

Blogtoberfest DAY 21

Oh dear dear me!! 

I have failed to keep up on my Blogtoberfest every day posting!!    Slappy Handy!!

Days just seem to be whizzing by and I haven't been around to organise what I wanted to post about!

I really am going to have to play catch up now but not necessarily in the order of my original schedule!  I am not good a time keeping so why I thought I could keep to a schedule I really don't know!!!  Ha ha!!


So Saturday Snippets

I headed off to the Big Bead Show at Sandown Park in Esher, Bead Magazine's Bead Show and their British Bead Awards, the winners where announced and Best in Show voting by the Bead Show attendees, I placed my vote but I didn't win any giveaway prizes though!

I did, however, get a bit carried away and my 'flexible friend' suffered a bit!

Tools were on the list amongst other things ~~ wire mainly but I did need that for my workshop which I might add is looming up fast on the 2nd November.  I have some students booked on it so its a Goer, YAY!   Need to make sure I have the necessary wire for that.

Well back to the TOOLS!

Top of my list was Letter Stamps for metal. TICK got those!  You might see my endeavours in the future.

New pair of wire cutters.  TICK got those with orange handles no less!

Pin vice, TICK.  Another pair of Nylon coated pliers, TICK got those!  Digital Calipers, TICK. And a Center Punch, TICK to them all! 

I did get a few beady things which included some solder paste and some st. silver beads and bead caps from Palmer Metals.  Gosh won't I be a busy beader!!! Whoahoo!!!!


I didn't get the wire as the supplier wasn't at the show so will need to order that on line, but I think I did quite well!  80))

And it was also my Wedding Anniversary so a lovely Chinese Takeaway for Tea!! Yum yum!


Next ~ The Sunday Gathering


I have got a few new beads to show you along with some new headpins which I have listed in my Etsy store


Jumbo Chatelle Beads


Leaves Headpins on copper wire


Sea Urchin Buttons and beads 

Just as few new things.


I do need to do some forum bits and bobs but will pop back to do that when I have sorted it out.


That's about it for now


E x