Wirework Tutorial
How to make Basic Earwires

So here we go then ~~~
Equipment and Materials you will need:

Half Hard Sterling Silver Wire 0.8mm
Wire Cutters
Round Nose
Pliers
Ruler
Mandrel - You can use a Ring Mandrel or Multi Tool but
I have used a piece of steel piping, you can also use a pen barrel (make sure it is completely round - no flat edges to it)
Silver
cleaning clothI have used a piece of steel piping, you can also use a pen barrel (make sure it is completely round - no flat edges to it)
You also need for forging the wire:

Hammer ~ a Chasing hammer is preferable but a ball
pein hammer will surfice (make sure it has a nice smooth head any dents etc.
will mark the wire)
Anvil or
steel blockNeedle file

1. Take
your wire and unravel enough to use approx 8" then to stretch/straighten
the wire, run it through your thumb and forefinger a few times (this also
helps to harden the wire!)
NB: You don't need to straighten the wire
completely this just helps with measuring the amount your require, as the curve
already in the wire can be helpful in the process of making the earwires.
Cut 2 x 4" pieces of wire.

2. Now to
make a turned loop in each wire, grasp the wire with the round nosed pliers,
making sure it is right at the very tip of the wire.

Turn a loop around the blade of the pliers.

NB: If you left the natural curve of the wire make
sure you turn the loop in the opposite direction to the curve (see below).

Repeat to make a loop in the other wire.
3. Take the
mandrel (piece of pipe) and place the earwire over it, making sure the loop is
facing out (perpendicular to the mandrel)

Curve the ear wire around the mandrel, at this
point you could do both earwires at the same time, this helps to make them to
near 'exactly' the same!

Bend them around the mandrel so the ends nearly
touch the loops. They will spring back
and open again.

4. Still
holding the earwires together, grasp them approx ¼" from the end with your
round nose pliers, bend the wires back slightly to give them a straight end.

It is your choice how far you want to bend them.

NB: I usually tweak the earwires a little now so
that they both look completely even, until I am happy with them.
5. Trim the
ends so they are equal in length, make sure that both the earwires are held in
the same position

They should look something like this!!

6. Now the ends need to be filed with the needle
file to remove all the rough edges.

First flatten off the end, and then work around
the edges, always pulling the file down across the wire with fairly small
sweeps.
NB: NEVER file backwards and forwards across the
wire ONLY downward sweeps!!
Repeat for the other earwire.
Depending on what, the loop end of the earwire,
seems like you may want to file these too. Either before you make the loop or
you could twist the loop out slightly so you can get the file in to smooth the
ends, don't forget to straighten again afterwards! Or do this before turning your loop in the initial first step.
7. Now to help strengthen the earwires you need to
do a little forging of the front part of the wires. Place the earwire onto the anvil or steel
block

With the chasing hammer now lightly hammer only
the front part of the earwire, making sure not to hammer the loop,
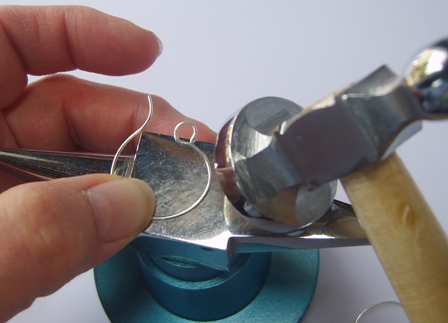
turn the earwire over and do the same to the other
side.
Repeat for the other earwire.
NB: The
forging process can distort the earwires sometimes so they will need a little
tweaking to help straighten them again.
8. Well,
all that is needed now is to clean the earwires to give them a lovely shine and
remove any dust particles. I generally
use a silver cleaning cloth as they are quite small but if you have a tumbler
this can help strengthen them or you can use a Dremel like power tool too (being very careful).

There now your very first pair of earwires!!! All
made by your own fair hand!!
I posted this tutorial on my other blog back in 2010 and decided to move it over so you can still have access to it here on my new blog. I hope it is helpful and I will be adding more tutorials in various wire working techniques in the future.
Enjoy
E x
Nicely done, Elaine! Great tutorial.
ReplyDeleteThank you Susan. I appreciate your feedback!
DeleteFab! I didn't know you should only file one way, learn't something new, thanks Elaine xx
ReplyDeleteOh good glad you were able to learn something from it. The files only work one way (downwards) so all that happens is you blunt the teeth on the file. Just a bit more info for you. x
Delete