Showing posts with label tutorial. Show all posts

Tuesday, 15 April 2014

Top Tip Tuesday ~~ Tutorial ~~ How to make Wrapped Loops

How to make:  Wrapped Loops


You will need:

Wire cutters
Round nose pliers
Flat nose pliers
Chain nose pliers

Head pin
Beads


1.  Onto a headpin place on desired bead(s), do not trim headpin as you did in the turned loop.


2.  Grasp the headpin with round nose pliers, approx. 4mm above the bead


3. Start to pull the wire around the blade of the round nose pliers, using your fingers or chain/flat nose pliers, to form the loop.


4. The wires should cross over


bend back the upright wire to centralise the loop (as in the turned loop)             


Tip: At this point you need to attach to the chain and/or earwire, if do not want to use a jump ring to attach the bead component.


5. Now take the chain nose pliers and hold the loop,


Grasp the loose end with a second pair of pliers (I use flat nose pliers but you can use whatever you have), pull this wire around the upright wire; ensuring this wire is perpendicular to the upright wire.


Tip:  If the wire is not perpendicular you will get sloping or diagonal wraps and they may not be neat and tidy. Using the flat nose pliers, straighten this wire so it sits perpendicular.


6.  Continue to wrap the wire around the upright until you get to the bead, the usual amount of wraps is 3 but it can be any number you want it to be, you are only limited by the length of wire left on the headpin.


Tip: While winding take the wire to the top (still holding the loop with the chain nose pliers), let go with the flat nosed pliers and reposition your hand by grasping the wire from the back and carry on by pulling the wire round and towards you 


and up 


let go again and reposition as before to pull upwards to the top once again


Don’t try and complete a wrap all in one go!


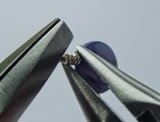
7.  Take the cutters and trim off the wire end as close to the base wire as possible.


Tip: You may need to straighten the loop after the wraps are complete as it can sometimes tip over slightly. Put the round nose pliers back into the loop to do this, as if re-turning it again.


Also the base wire can bend over slightly, just use your flat-nose pliers to straighten the loop so it becomes upright again.  


8.  Take the chain and/or flat nose pliers and tuck the end in by squeezing it down


slowly moving round the wire so no more wire is sticking out, until it is neat.


A Wrapped Loop


The wrapped loop is a little difficult to get right but with practice will become easier.


I hope you find this tutorial helpful and if you have any difficulties or any questions please contact me, I am happy to help.


Once you have mastered the wrapped loop, it is a very useful skill to have and can be used in many different ways within different types of jewellery making, earrings are a very common use but can also be used in bracelets, pendants/necklaces for linking or connecting components together, maybe in brooches and even in other types of accessories.


Bangle on a wire, connection to chains.


Beaded Finial on the clasp of a bangle


Necklace - Beads on a wire, connection to chain


Bookmark -  Connections between beads


Next time I will cover Coiling (I do not use a Gizmo) all done by hand.


Until then lots of practising required.  80))


E x


Tuesday, 31 December 2013

Out with the OLD! Goodbye 2013!

I can't believe where this year has gone, I have to admit I can't wait to see the back of it to be honest!

Why? Because its has been one hell of a year for me and my family.
There have been highs and lows but mainly stressful lows I am sorry to say!


So seeing in the New Year 2014 will be very well received with great expectation!
I made many plans at the beginning of this year and I achieved very few of them, I will not be putting myself under anymore pressure that way, 2014 will just happen how it happens!!! I have stepped back and taken a look at my life throughout my 50th year and thought I just want to do what's right for my family and me!

So my daughter achieved great results in her GCSE exams back in the summer but it was a hard slog for her and it felt like I was doing them with her!  Her A-levels have also been hardwork too so far, as it has been a big jump from the GCSE's but she has now started to get to grips with them and slowly she is finding her feet and beginning to plan her time better and with a little help from a Maths tutor she is finding its getting better ~~ little steps!
 
Hubbie has serious back problems which is general wear and tear of his job but he struggles on, often has physio on it but there isn't much they can do really!  I think it will deteriorate more and more so its time for me to get out there and find a proper job, well more hours anyway.

So for me the new year will find me job hunting, what sort of job will be the main problem!!! This will mean less jewellery making for me, I do still intend to be beadmaking which can be fitted around a job but I just can't cope with both.

Jewellery making I will still do things just nowhere near what I used to do, saying that I hardly did any this year but that was due to other circumstances! I will make for myself and friends but I probably won't sell as much as I have in the past. I have been adding tutorials to my blog and I still intend to carry on with that.....  even though I haven't been very good over the last month or so... eek! 

I started it in the Blogtoberfest during October and I will try my best to post on Tuesday's my Top Tips day! I feel my blog is important to me and I would really like to build a following to help other jewellery makers out there. I have been starting with the basics and will build up to the more detailed things as I go along.

I have taken a little break from my magazine work but I do hope to get back to it next year as I have a couple of items I've promised to do, they are still in the planning stages but I must finish those as soon as I can get going again. 80))


I think that's about it  ~ Oh Ummmm....


I would just like to say I hope everyone out there in blogland had a great Christmas ~~

I enjoyed it ~~

I got some new tools which I can't wait to have a little go with ASAP


and some new books with some new techniques I want to try out


both from Amazon


The Torched Fired Enamel book I can have a go right away ~ so I will let you see what I do when I have had a play, very eager to get going on that one! I am also awaiting one that's only just been released and I am hoping that it will arrive on my Birthday which will be really cool!


so all there is left to say is ~~~~ here's to a


VERY HAPPY NEW YEAR
2014
 
to
Everyone


CHEERS!! <3


E x


Tuesday, 10 December 2013

Top Tip Tuesday ~ Jewellery Basics Tutorial ~ Turning Loops

Jewellery Basics Techniques


I will be adding a number of Jewellery Basics to my blog along with other techniques in wirework.
 
In this tutorial I will show you how to make a turned loop using both methods, I have used one single bead to show how to do it with a bead in place.  I recommend that you try a few times on some spare, old or cheap headpins to practice before making a pair of earrings, for instance.
 
A Turned Loop


1. On a headpin place on beads in desired pattern/design.  


2. Trim headpin down to approx. 1cm above the last bead.


3. Take the round nosed pliers, grasp the end of the headpin between the blades at the very tip.


Tip:

Ensure the tip of the pin does not protrude above the blades of the pliers, run your finger across the top of the blades ~ you shouldn't be able to feel the tip of the pin.


4.  Turn the pin around the blade pushing down with your thumb to form the loop, until you can't go any further.


5. Reposition your blades to continue with the loop until it closes, straighten you hands to allow you to continue comfortably


this should resemble a ‘p’ or ‘q’ shape 


6.  To finish the loop, place blade of pliers into the back of the loop


NB:  take careful note of the position of the blades in the loop
  

7.  Bend back the wire to centralise the loop above the bead  


You may need to ‘tweak’ the loop as the bending can cause the loop to open a little, to close it up, just place your blades into the front of the loop again and just pull around to remove the gap, making sure you have fully inserted the blade into the loop, otherwise the loop can distort.    
You could also squeeze the loop together using flat nosed pliers, very slowly and carefully ~ too much pressure could end up completely distorting the loop and destroying the circular shape of the loop.


                                         A Turned Loop
 
 
Turned Loop – Alternative Method

1.  Place beads onto a headpin, bend the pin back at 90° angle just above the bead


2.  Trim headpin to 1cm.  Grasp pin with round nosed pliers at the very tip.


3. Bend the pin around the blade to form the loop in the opposite direction to the bend        
                                          

Tip:

Use your other thumb to help guide the wire around the blade as before.


NB:
 
If the end of the wire sits above the bead, too high, then you can trim the wire and carry the loop round to close it once again.  This shortens the wire so bringing it down lower, nearer to the bead.


That's it all done!


Next time ~~

I will show you how to make a Wrapped Loop ~  a little more complex than the turned loop but definitely worth the effort to master this technique as it has many uses and is a very fundamental wirework technique.


Til next time

E x


Saturday, 5 October 2013

Saturday Snippets ~ DAY 5

Its rather late as I forgot to take some pictures of my bead session this week so I have decided to do something else!

New issue of Bead has been published and this issue has my Steampunk Fashionista Necklace tutorial in. 


I enjoy making long necklaces and I am so 'into' steampunk right now, I love this very popular current trend. My Pinterest boards are full of all sorts of lovely creations.


Purple version


Green version


The purple version used for the tutorial has a locket watch for the main focal whereas the green version had a large watch/bee charm. 

It has inspired me to have a go at making some beads or cabochons within the steampunk genre!!  I reckon I will have a play this week and have a little go at seeing what I can come up with.


 E x


Saturday, 22 June 2013

Latest Issue Bead

Look at me posts back to back!!

Do I here a whoop whoop whoop!!  No ~~ oh well here goes anyway!!

The Latest issue of Bead ~~  I made the front cover with my copper/pink bangle.


Bottom right corner


The bangle is called Chinese Whispers I thought it had a little chinese feel to it and liked the name so here are all the colour variations I made for it.


I love the colours really vibrant, with my weaving technique for the project, the pink wire is using 0.315mm wire and the purple is using 0.56mm wire. the difference is the pink is much finer and the purple more obvious.

Would love to know if you have decided to have a go at trying it out.


~~~~~~~

I will be adding more tutorials to the blog very soon and I would love to know if you would like to see me do any specific tutorials for you.

I do love to get comments so don't be shy leave any comments you want to pass on I always read them and will respond when possible.  (Please no advertising though)


More updates very soon!


Toodleoo


E x


Saturday, 11 May 2013

Latest Bead Magazine

I know its a bit late but I am in the latest issue of Bead Magazine


here is my tutorial piece(s)

Swirling Tempest


Its wild and stormy - this issue was a special issue with the theme Back to Nature.

I decided to use one of my seascape beads as the focal I dont use my own beads very often but as I am also profiled in this issue of the magazine as well,  I was able to use my beads in the project, so the article had a 2 page spread and the project had a 4 page spread so lots of pages - huh!!!!  80))

It was quite a large advanced project and it took me a while to write it so my next one isnt so large but I did enjoy making it and I am pretty pleased with it.   I hope the readers will like it.


I also made the connectors and the beads on them too. Its my first major project where I made the majority of the components, so I am pleased with this achievement and one I have had on my long list of goals to fulfill. So thats another tick in the box!!


Next time I will show you what new ideas I have been working on.

So till next time

Toodleoo


E x


Monday, 17 December 2012

How to make Basic Earwires


Wirework Tutorial

How to make Basic Earwires

 
In this tutorial I assume you know how to turn a loop in wire!  I also make earwires at the same time this helps with making them exactly alike!


So here we go then ~~~


Equipment and Materials you will need:


Half Hard Sterling Silver Wire 0.8mm
Wire Cutters
Round Nose Pliers
Ruler

Mandrel - You can use a Ring Mandrel or Multi Tool but
I have used a piece of steel piping, you can also use a pen barrel (make sure it is completely round - no flat edges to it)
Silver cleaning cloth


You also need for forging the wire:


Hammer ~ a Chasing hammer is preferable but a ball pein hammer will surfice (make sure it has a nice smooth head any dents etc. will mark the wire)
Anvil or steel block

Needle file


1.  Take your wire and unravel enough to use approx 8" then to stretch/straighten the wire, run it through your thumb and forefinger a few times (this also helps to harden the wire!)


NB: You don't need to straighten the wire completely this just helps with measuring the amount your require, as the curve already in the wire can be helpful in the process of making the earwires.

Cut 2 x 4" pieces of wire.


2.  Now to make a turned loop in each wire, grasp the wire with the round nosed pliers, making sure it is right at the very tip of the wire.


Turn a loop around the blade of the pliers.


NB: If you left the natural curve of the wire make sure you turn the loop in the opposite direction to the curve (see below).


Repeat to make a loop in the other wire.


3.  Take the mandrel (piece of pipe) and place the earwire over it, making sure the loop is facing out (perpendicular to the mandrel)


Curve the ear wire around the mandrel, at this point you could do both earwires at the same time, this helps to make them to near 'exactly' the same!


Bend them around the mandrel so the ends nearly touch the loops.  They will spring back and open again.


4.  Still holding the earwires together, grasp them approx ¼" from the end with your round nose pliers, bend the wires back slightly to give them a straight end.


It is your choice how far you want to bend them.


NB: I usually tweak the earwires a little now so that they both look completely even, until I am happy with them.


5.  Trim the ends so they are equal in length, make sure that both the earwires are held in the same position


They should look something like this!!


6. Now the ends need to be filed with the needle file to remove all the rough edges.


First flatten off the end, and then work around the edges, always pulling the file down across the wire with fairly small sweeps.


NB: NEVER file backwards and forwards across the wire ONLY downward sweeps!!


Repeat for the other earwire.


Depending on what, the loop end of the earwire, seems like you may want to file these too. Either before you make the loop or you could twist the loop out slightly so you can get the file in to smooth the ends, don't forget to straighten again afterwards! Or do this before turning your loop in the initial first step.


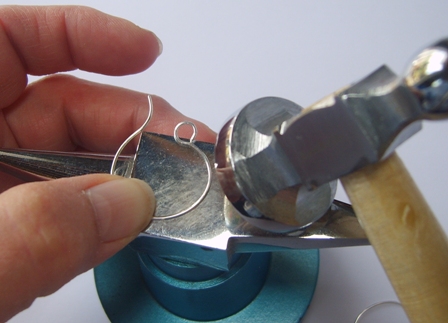
7. Now to help strengthen the earwires you need to do a little forging of the front part of the wires.  Place the earwire onto the anvil or steel block


With the chasing hammer now lightly hammer only the front part of the earwire, making sure not to hammer the loop,


turn the earwire over and do the same to the other side.


Repeat for the other earwire.


NB:  The forging process can distort the earwires sometimes so they will need a little tweaking to help straighten them again.


8.  Well, all that is needed now is to clean the earwires to give them a lovely shine and remove any dust particles.  I generally use a silver cleaning cloth as they are quite small but if you have a tumbler this can help strengthen them or you can use a Dremel like power tool too (being very careful).


There now your very first pair of earwires!!! All made by your own fair hand!!


I posted this tutorial on my other blog back in 2010 and decided to move it over so you can still have access to it here on my new blog. I hope it is helpful and I will be adding more tutorials in various wire working techniques in the future.
 
 
Enjoy
 
 
E x